A few months ago I picked up a used Tokyo Marui VSR-10 G-Spec sniper rifle off of Prefired as my buddy had just bought an SSG-24 and I fancied getting in on the sniper action too!
The VSR was in great condition (bar an awful tiger stripe camo finish) and was complete with a raft of upgrades including a Wolverine Bolt HPA system plus CO2 adaptor (which is what specifically what attracted me to the gun).
Attempt #1 – CO2 adaptor in stock
I’ve never been a fan of tanks and remote lines so my intention was to sell off the remote line/tank etc and try to integrate the CO2 adaptor into the stock for a pretty ‘factory’ looking finish.
Sadly the whole CO2 ‘thing’ was dire as out of a 12g cartridge I could manage a max of about 70 shots and out of those 70 shots the first 10 or so would be about 20-30 fps higher than the next 30-40 and then the remaining shots would be all over the place which made it pretty impossible to set the gun up reliably! As running a remote line to a HPA tank was still a definite no-no, I had to come up with a new plan!
Attempt #2 – Integrate small HPA tank, pretty up with Kydex cover
I posted my woes on the UKAC Facebook group and asked if anyone had experience in hacking apart a stock to integrate a HPA tank and then forming a ‘cover’ out of Kydex to tidy things back up. Of course on the whole, the answer was silence however I did have one chap get in touch with me saying this was right up his street and as such we hashed out a plan, a budget and I sent the VSR along with some news bits I had bought (a Polarstar Micro Reg as it was the smaller than the Wolverine reg and a G&P 8.5ci tank – again, the smallest I could find!).
Several weeks late and at nearly 3x the agreed quote, I finally got my VSR back however there were a number of issues that I wasn’t happy with;
- There was supposed to be an access panel that would allow me to easily view the reg & tank pressure gauges as well as lock the reg with a cable tie – I was able to view one of the gauges but nothing else.
- The joins between the original stock and the new kydex cover weren’t as good as discussed or had expected
- The kydex cover itself wasn’t symmetrical as per the brief, a real bug bear of mine!
- By far the biggest issue thought was that the buttpad no longer covered the end of the stock which left a bit of an unsightly mess.


Whilst trying to find a solution for a replacement, custom fit, butt pad, I was introduced to Jake @ JB3D Custom 3D Printing & Design. The intention initially was to have him 3D print something to neaten things up but after some discussion, we decided to just start from scratch with a completely custom 3D printed stock.
Attempt #2 – Design & build a custom 3D printed stock from scratch
The great thing about working with Jake is that he doesn’t cut corners and has great attention to detail, most of the finer details or problem solving he figures out by himself where as some people I’ve worked with in the past need spoon feeding at which point you start to wonder who is the expert? 😛
My main requirements from the stock were as follows:
- Design & scale to loosely match that of a VSR where possible
- Stock to accommodate my G&P 8.5ci tank and P* MR Gen2
- Removable panels to provide access to refill connector and gauges
- Removable butt pad to allow quick and easy removal of bottle
- Addition of an adjustable cheek riser
- Somewhere to stow the reg pressure adjustment key
- Improvements to the retention of mags to prevent drooping
- Good balance of rigidity without increasing weight
- Printed in a material that could be cerakoted at a later date


As you can see from the small sample of photos above, there were a lot of design iterations and this is because (and as mentioned before) Jake is a perfectionist rather like myself 🙂
To speed up production times and save costs whilst test printing, the print was broken down in to a few components and any old surplus filament was used.
Once the fit was perfected, a full final print was issued in PLA-N. I opted for PLA-N as it has improved strength and heat resistance properties and both were necessary (the former to reduce flex in the stock and the latter so that I can get the stock cerakoted).
The print took a staggering 55hrs+ to complete and even then, the best part of another day of manual preparation was necessary. Preparation included; removal of supports, sanding of the entire stock, installation of a metal reinforcement rod going (between grip and stock to reduce flex), installation of a hollow metal rod for air line and battery wiring to pass through, installation of magnets for access panels & installation of M5 nuts for cheek riser and butt pad fixing screws.
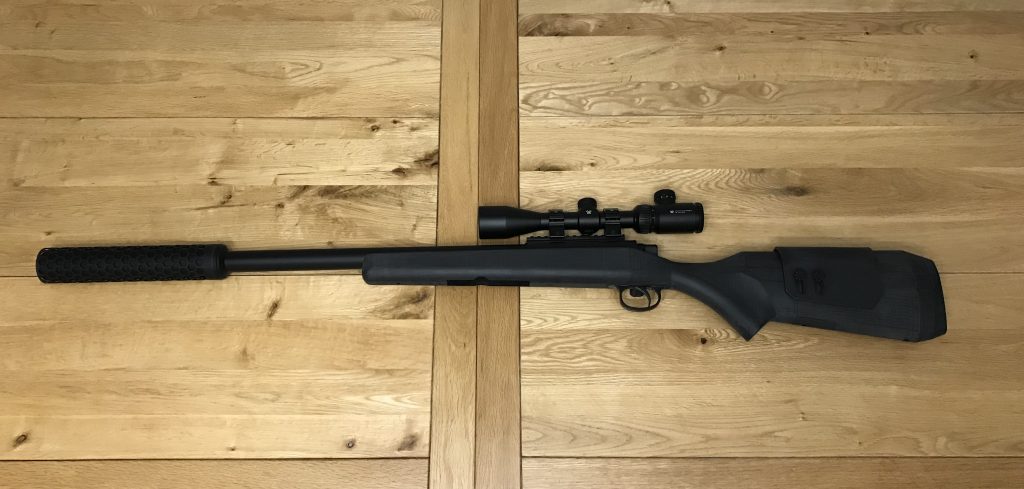
All in all, this was a mamoth job, there must have been circa 30+ hours of design work, hundreds of hours in print time and many Parcelforce trips back and forth for testing/feedback but the end result is truly unique and absolutely fantastic – I doubt there is another HPA VSR in the planet that’s as sleek or as functional as this one!


0 Comments